With recent updates to MAAS and Curtin, deploying Ubuntu with a ZFS root disk is now possible! Curtin added zfsroot support earlier this year and MAAS has now exposed the option.
However, Ubuntu root on ZFS with MAAS is experimental! We encourage users to try this out and report back any issues, but it is not a supported scenario.
ZFS is known for an amazing list of features:
- copy-on-write cloning
- continuous integrity checking
- snapshots
- automatic repair
- efficient data compression
The following article takes a look at how using ZFS for the root filesystem of an Ubuntu system can take advantage of these features. Again, this is experimental and not supported, but we are encourage users to try this out and let us know if any issues occur.
MAAS Configuration Link to heading
As with other MAAS settings, configuring a ZFS root disk is as easy as choosing ZFS as the partition type and setting / as the mount point:
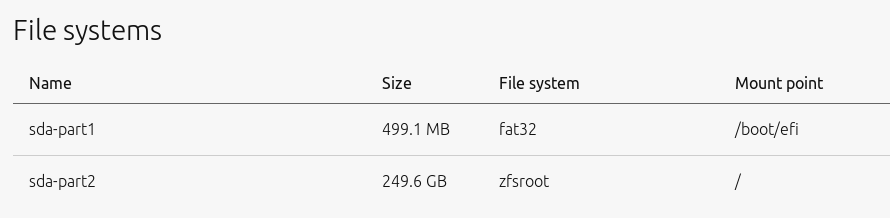
Once applied, the resulting disk setup should then look like the following with a EFI boot partition and the ZFS root partition:

MBR Partition Record Link to heading
To use ZFS root MAAS requires the disk use a GPT partition record. This type of partition type is only enabled if a disk is larger than 3TB or if the system is booting via EFI.
If a user attempts to install using a ZFS root with MBR they will receive an error message:
| |
Post-Deploy Verification Link to heading
After the deployment, a user can verify the ZFS root filesystem using lsblk, parted, as well as using ZFS commands.
| |
The lsblk output matches the requested MAAS storage configuration. Parted output shows how the file system is using ZFS and the zfs and zpool commands show the pool used by the ZFS root.
ZFS Snapshots & Rollback Link to heading
One of the key features of ZFS is the ability to provide snapshots. The following demonstrates how to take a snapshot and rollback the entire or part of the filesystem based on that snapshot.
Snapshot Link to heading
To manually take a snapshot, provide the path to the ZFS filesystem and a snapshot name in the format filesystem@snapshot_name. Destroying the snapshot is similarly done with the name of the snapshot. Note that ZFS datasets cannot be destroyed if a snapshot of the dataset exists.
| |
Rollback Link to heading
To do a full disk rollback, first requires that the root file system get unmounted as a mounted filesystem cannot be completely restored and will not be completely successful. The actual mechanism in ZFS will attempt to unmount a mounted filesystem during rollback.
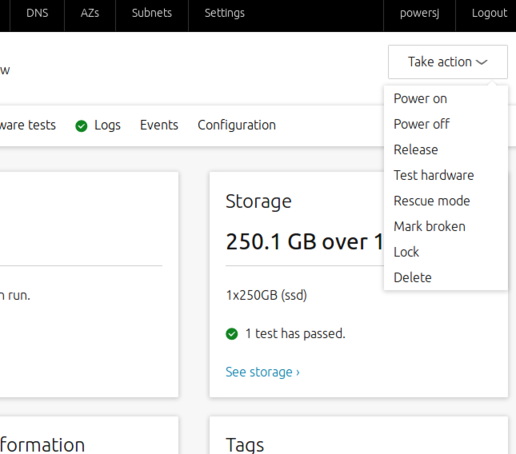
The easiest way is to use MAAS to boot into rescue mode. This is done by selecting Rescue mode from the Take action menu of the node:
Once in rescue mode, all that is required is to install the ZFS utilities and rollback to the specified snapshot. The system then needs to exit rescue mode via MAAS and the user can boot back into the restored system.
| |
Manual Restore Link to heading
Even with the mounted root filesystem some fixes are possible. Snapshots are stored on the filesystem under the /.zfs directory. A user can find the files under the appropriate snapshot and directory and attempt to restore them.
Take for example someone deleting /srv, the admin could have gone under /.zfs/snapshot/initial to find the missing data.
| |
zfs-auto-snapshot Link to heading
Snapshots are cheap, worth having, and zfs-auto-snapshot. makes setting consistent snapshots easily. zfs-auto-snapshot is available in Ubuntu 18.04 LTS and later releases and works with zfs-linux and zfs-fuse to create periodic ZFS snapshots at the following intervals:
- every 15mins and keeps 4
- hourly and keeps 24
- daily and keeps 31
- weekly and keeps 8
- monthly and keeps 12
An hour after installing, a user will see a set of new snapshots.
| |
Once setup, zfs-auto-snapshot will log messages to syslog when a snapshot is taken.
| |
Backup ZFS Snapshots Link to heading
Of course, taking a snapshot is great for rollbacks due to mistakes, but snapshots are not to be considered a backup. As a result, keeping snapshots on a different system or location is essential if the data is considered critical.
Snapshots can be sent to a file or received from a file to allow for simple backup and restore.
| |
Another option is to send the snapshots to a remote system already setup with ZFS. First, on the remote system that will store our backup of a ZFS snapshot create a pool to store the snapshots.
| |
Assuming the user already has SSH keys in place to allow for passwordless login then it is time to send the ZFS snapshot. This is done using the send and recv ZFS sub-commands to send a snapshot from the local system and have it received by the remote system.
| |
On the remote system, verify the snapshot was received by looking at the pool and the snapshot listing.
| |
Finally, to pull a snapshot back to the local system use the same send and recv ZFS sub-commands in the opposite direction.
| |
Scrub Link to heading
As mentioned at the beginning ZFS has the ability to silently correct data errors. This is accomplished through the scrub action. A scrub will go through every block of the pool and compare it against the known checksum for that block. The consequence of which is that a scrub can impact performance of the disk while run.
By default zfsutils-linux will come with a crontab entry that will scrub the disks.
| |
A user can setup a second crontab to run more periodically if necessary or a scrub can also get executed manually.
| |
Upgrade Link to heading
The most reason versions of ZFS utilize dataset feature flags to specify a property for changes to on-disk formats. The original method was a single version number, but given OpenZFS is developed distributed rather than by a single company, utilizing feature flags make for easier determination of features supported versus the single number.
If a user attempts to enable a feature that the dataset version does not support a message requesting an upgrade will appear. Upgrading a dataset is as simple as running upgrade on that specific dataset. However, do note that an upgrade is a one-way path and may make the dataset unavailable to tools which do not support a particular feature.
| |
Compression Link to heading
The first of two ways to save disk space is to enable compression. With ZFS compression is done transparent to the user, as ZFS is compressing and decompressing data on the fly. Files that are not already compressed will take advantage of this, while already compressed data will not. The overall cost to enabling compression however is minimal due to modern processors handling the work easily.
The LZ4 algorithm is generally considered the best starting point if a user is uncertain of what type of compression to enable.
| |
A user can judge the overall efficiency of enabling compression by viewing the compression ratio on the pool. Do note that enabling compression on a dataset is not retroactive. As such the compression will only occur on new and modified data after enabling it.
| |
Deduplication Link to heading
A second mechanism of saving disk space is to enable deduplication. ZFS utilizes block level deduplication, rather than file or byte level, as it is a nice trade off in terms of speed and storage.
A user must be extremely careful when enabling deduplication and understand the risks associated with it. To achieve performance to justify deduplication the system is required to have sufficient memory to store deduplicate data. In the event that not enough memory exists the duplication data gets written to disk reducing performance greatly. Turning deduplication off will not solve any scenarios where the duplication table is already getting written to disk.
A general heuristic for system memory is for every TB of pool data the system should have 20GB of system memory. The large number is due to the need to account for the needs of memory for the operating system, workload, other metadata, and to account for the deduplication table to minimize the possibility of writing to disk.
In order to first test if deduplication would have any effect a user can test it by created a test pool, enable deduplication, and copy test data over. A second option is to use the zdb -S command to simulate deduplication and get an estimated measure of the effect.
| |
Additional Pools Link to heading
Finally, if users have additional disks they can take advantage of the aforementioned ZFS features using additional pools.
In this example, two new disks /dev/sdb and /dev/sdc were added to the system.
| |
To create a new pool, a user runs using the create command and pointing at the additional disks.
| |
Conclusion Link to heading
MAAS enables users to easily deploy ZFS as their root filesystem and explore advanced filesystem features. Consider taking root ZFS for a spin with MAAS!